Using ASP.NET Core SignalR with Vue to Implement Web Notifications.
By Malinda WimalasenaThis article is mainly about implementing a simple web notification system in a Vue application using basic functionalities provided by SignalR. Here, we will explore how we can configure SignalR in a .NET Core application and how to integrate SignalR client in a Vue application. You can have a better understanding of SignalR features and functionalities which enable client-server bi-directional communication by implementing web notifications.
What is SignalR?
SignalR is an open-source library that enables real-time communication in .NET applications. This real-time functionality means the server has the capability of pushing content to connected clients. SignalR establishes a persistent connection between the client and the server using WebSockets. When it’s not available SignalR tends to use other technologies such as long polling. It provides API to create server-to-client procedure calls which can trigger client-side functions from the server-side. Additionally, it also provides API to manage client connections with the server.
Adding SignalR into .NET Core project
• What is a SignalR Hub?
SignalR Hub works as the middle layer between the server and the client to ensure bi-directional communication. On the server side, we can define the methods that should be called by the client. On the other hand, on the client side the methods which are called from the server should be defined.
• Creating and using Hubs
We can easily create a hub by inheriting from the Hub class. Then client can access the public methods inside that class.
public class NotificationHub : Hub
{
    public Task SendMessage(string user, string message)
    {
        return Clients.All.SendAsync("ClientReceiveMessage", user, message);
    }
}
The properties of the Clients object can be used to specify the receivers of the message.
Clients.All - send message to all connected clients
Clients.Caller - send a message back to the caller
Clients.Group - send a message to a specific group of clients
• Since SendAsync Method depends on the string value of the client methods, it would cause run time errors if the method names were misspelled. SignalR has provided a better solution for that one by introducing strongly typed hubs. So that, we can put all the client-side methods into an interface and call those methods through it from the server.
public interface IClientNotificationHub
{
    Task ClientReceiveMessage(string user, string message);
}

public class NotificationHub :

Hub<IClientNotificationHub>
{
    public async Task JoinNotificationGroup(int userId)
    {
        await Groups.AddToGroupAsync(Context.ConnectionId, userId.ToString());
    }
}
Instead of using just a string message, let’s say you want to send a set of data that can be used to show a meaningful notification on the client side. Therefore, you can define a custom notification object and use that object as a parameter in a client-side method.
public class NotificationDto
{
    public int Id { get; set; }

    public int UserId { get; set; }

    public string Title { get; set; }

    public string Text { get; set; }

    public string NotificationEvent { get; set; }

    public bool IsAcknowledged { get; set; }

    public string RelativeNotifiedDateAndTime { get; set; }

    public DateTime CreatedOnUtc { get; set; }
}


public interface IClientNotificationHub
{
    Task ClientReceiveNotification(NotificationDto notification);
}
• Registering SignalR with .NET Core project
In Startup.cs file, add the below code snippet in the ConfigureServices method to configure the required services.
services.AddSignalR();
Then add the below code snippet inside Configure method to make the NotificationHub available for client applications. So that, client applications can access this hub through ‘http://localhost:5001/api/public/notify’
app.UseEndpoints(endpoints =>
{
    endpoints.MapHub<NotificationHub>("api/public/notify");
});
• Sending messages from outside a hub
Here, NotificationHub is the core abstraction for sending messages to clients. But based on different requirements, we have to send messages outside of the Hub. SignalR provides that service through IHubContext. .NET Core application can access IHubContext via Dependency Injection.
public class ExampleService
{
    private readonly IHubContext<NotificationHub, IClientNotifications> _hubContext;
    public ExampleService (IHubContext<NotificationHub, IClientNotifications> hubContext)
    {
        _hubContext = hubContext;
    }
}
After injecting HubContext, you have the access to all SignalR message-sending methods.
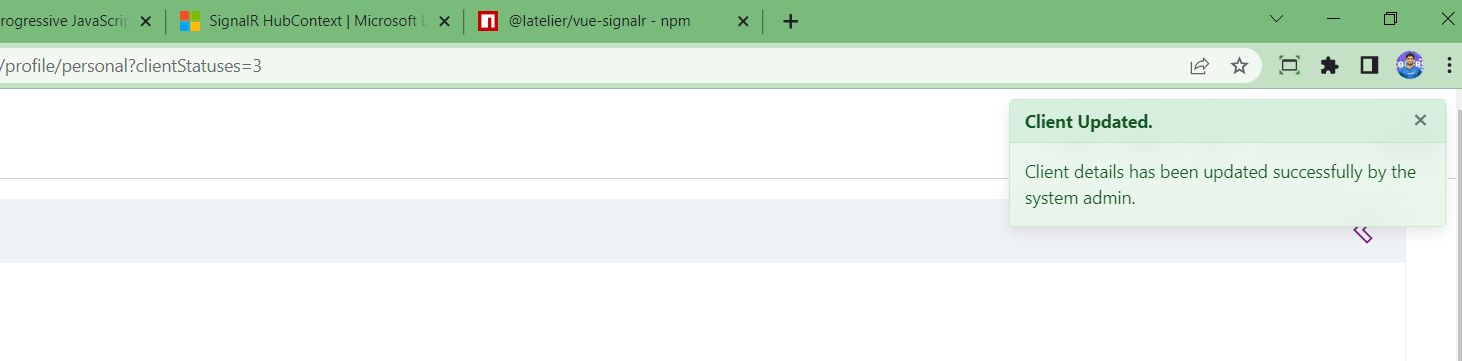
Example: If you want to notify a particular client when his details have been updated, you can simply create the corresponding notification object and call the ClientReceiveNotification method via the HubContext.
public async Task UserUpdateAsync(UserDto user)
{
	// logic of updating client details
    var notification = new NotificationDto()
        {
            UserId = user.Id,
            IsAcknowledged = false,
            RelativeNotifiedDateAndTime = GetRelativeNotifiedDateAndTime(DateTime.Now),
            Title = "Client Updated.",
            Text = "Client details has been updated successfully by the system admin.",
            NotificationEvent = "success"
        };

    await _hubContext.Clients.Groups(user.Id.toString()). ClientReceiveNotification(notification);
}
Note: If you want to show notification created time in the frontend view, you can use a method like this to find the relative date and time.
private string GetRelativeNotifiedDateAndTime(DateTime notifiedDateAndTime)
{
    Dictionary<long, string> thresholds = new Dictionary<long, string>();
    int minute = 60;
    int hour = 60 * minute;
    int day = 24 * hour;
    thresholds.Add(60, "{0} seconds ago");
    thresholds.Add(minute * 2, "a minute ago");
    thresholds.Add(45 * minute, "{0} minutes ago");
    thresholds.Add(120 * minute, "an hour ago");
    thresholds.Add(day, "{0} hours ago");
    thresholds.Add(day * 2, "yesterday");
    thresholds.Add(day * 30, "{0} days ago");
    thresholds.Add(day * 365, "{0} months ago");
    thresholds.Add(long.MaxValue, "{0} years ago");

    long since = (DateTime.Now.Ticks - notifiedDateAndTime.Ticks) / 10000000;

    foreach (long threshold in thresholds.Keys)
    {
        if (since < threshold)
        {
            TimeSpan t = new TimeSpan(DateTime.Now.Ticks - notifiedDateAndTime.Ticks);
            return string.Format(thresholds[threshold], (t.Days >= 365 ? t.Days / 365 : (t.Days < 365 && t.Days > 30) ?
                t.Days / 30 : (t.Days >= 2 && t.Days <= 30 ? t.Days : (t.Hours > 0 ? t.Hours
                : (t.Minutes > 0 ? t.Minutes : (t.Seconds > 0 ? t.Seconds : 0))))).ToString());
        }
    }

    return string.Empty;
}
Adding SignalR into the Vue project
Some SignalR client packages are available for Vue applications to establish a connection with the SignalR server and send/receive events. Here, we have used @latelier/vue-signalr package.
You can install this client package by running the below command in a terminal opened in the client repository.
npm i @latelier/vue-signalr
In the main.ts file you can add the below code snippet to establish the connection with the server. (You can use a URL stored in a .env file instead of ‘http://localhost:5001/api/public/notify’)
import VueSignalR from '@latelier/vue-signalr'
Vue.use(VueSignalR, 'http://localhost:5001/api/public/notify');
new Vue({
  el: '#app',
  router: router,
  store: store,
  template: '<App/>',
  components: {
    App
  },
  created() {
    this.$socket.start({
      log: true, // Active only in development for debugging.
    });
  },
})
If you get a $ socket-related TypeScript error, you can update the types.d.ts file to get rid of it as below.
import Vue, { ComponentOptions } from 'vue'
declare module 'vue/types/vue' {
  interface Vue {
    $socket
  }
}
declare module "vue/types/options" {
  interface ComponentOptions<V extends Vue> {
    sockets?: any;
  }
}
Creating a notification panel in the Vue application
This part is not related to SignalR implementation. For the sake of completeness, I have added the methodology that I have followed in implementing the notification panel. Here, I have used BoostrapVue b-sidebar, and b-alert custom components to implement the notification panel. (Here, API service is a custom service that handles HTTP requests to the server using axios).
<template>
  <div>
  <b-button class="notification-button" @click="onClickNotifications" v-b-toggle.sidebar-1>
    <i class='fas fa-bell'></i>
    <span v-if="showNotificationBadge"
      class="position-absolute notification-badge bg-danger border border-light rounded-circle ml-1">
    </span>
  </b-button>
  <b-sidebar class="my-side-bar"  id="sidebar-1" title="Notifications" right shadow>
    <div class="px-3 py-2 ">
      <b-alert v-for="notification in notifications" :key="notification.id"
        show :variant="notification.notificationEvent"
        class="notification-content">
        <h5 class="alert-heading"></h5>
        <p></p>
        <hr>
        <p class="mb-0 notification-footer">

        </p>
      </b-alert>
    </div>
  </b-sidebar>
  </div>
</template>
<script lang="ts">
  export default class CustomNavBarComponent extends Vue {
    notifications: any[] = [];
    userId: number = 0; // set userId based on logged in user data
    showNotificationBadge: boolean = false;
    onClickNotifications(){
      apiService.sendGetRequest("Utility", "Notifications", {userId: this.userId}).then(response => {
        this.notifications = response.data;
        this.showNotificationBadge = false;
      })
    }
  }
</script>
<style lang="scss" scoped>
  .notification-button {
        border-radius: 30px;
  }
  .notification-content {
      text-align: left !important;
  }
  .notification-footer {
      text-align: right !important;
  }
  .notification-badge {
      padding: 5px;
  }
</style>
Client to Server communication
Client-to-server communication is important when registering and deregistering client connections with the server. After successfully logging in to the system we can use the below code snippet to register a new connection with SignalR service.
this.$socket.invoke('RegisterForWebNotifications', this.userId)
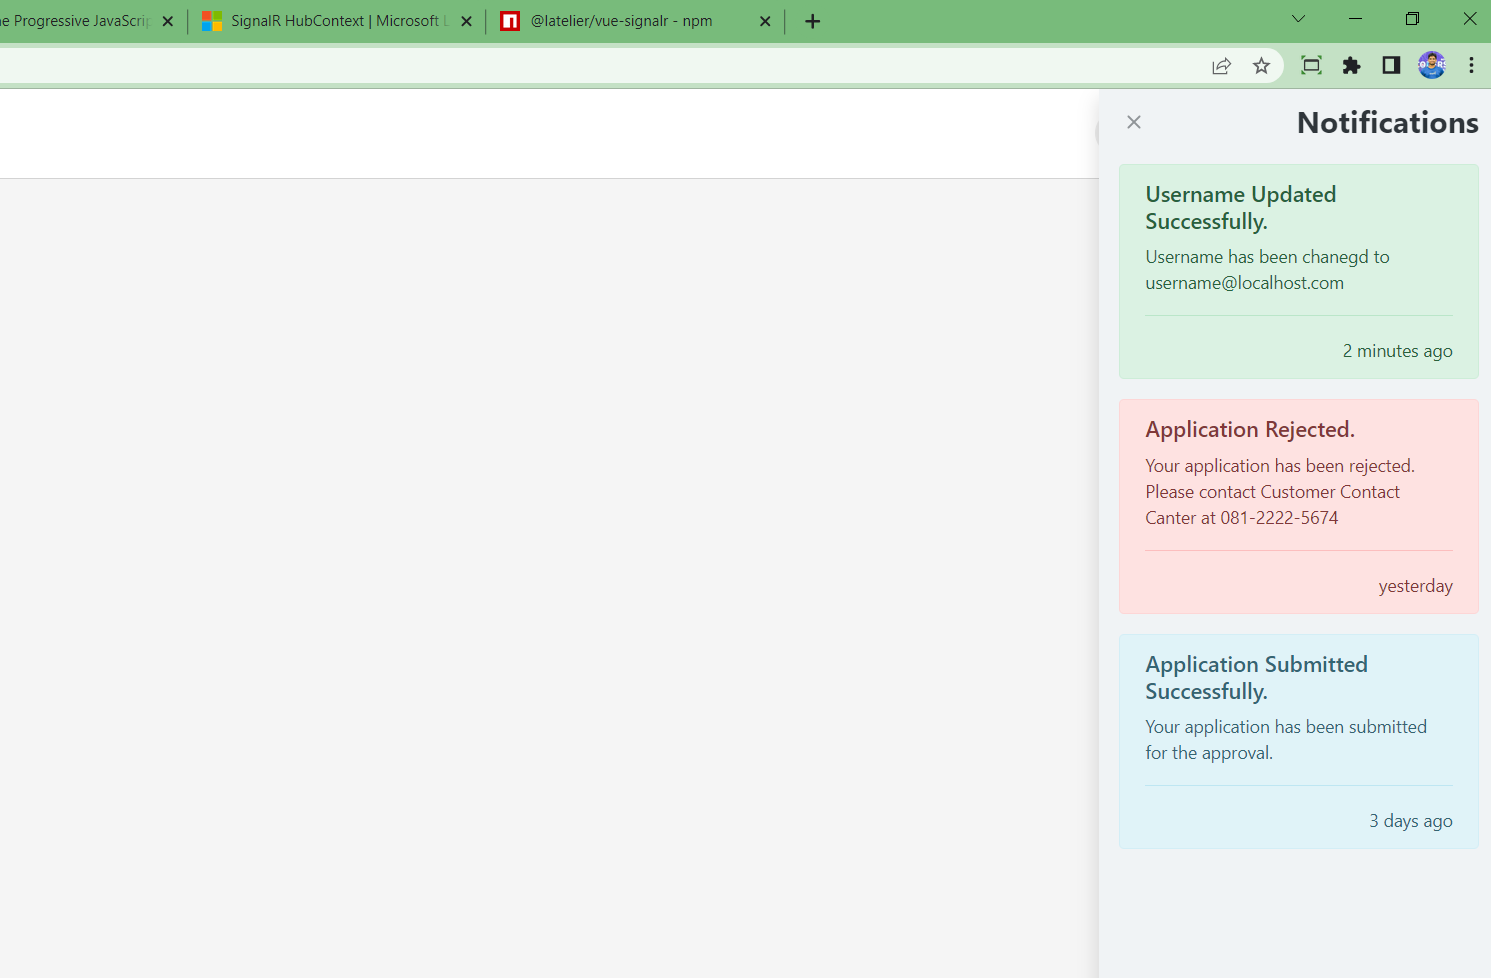
When clicking on the notification icon it will call the server endpoint which is responsible for sending notifications related to that client. Here, I have used a set of dummy data. You can add your logic to query data from a database corresponding to that user.
[HttpGet("Notifications")]
public List<NotificationDto> GetUserNotifications(int userId)
{
    return GetUserDummyNotifications().FindAll(i => i.LoginUserId == userId);
}
private List<NotificationDto> GetUserDummyNotifications()
{
    return new List<NotificationDto>()
    {
        new NotificationDto()
        {
            Title = "Username Updated Successfully.",
            Text = "Username has been chanegd to username@localhost.com",
            RelativeNotifiedDateAndTime = GetRelativeNotifiedDateAndTime(DateTime.Now.AddMinutes(-2)),
            NotificationEvent = "success",
            LoginUserId = 2,
            Id = 1
        },
        new NotificationDto()
        {
            Title = "Application Rejected.",
            Text = "Your application has been rejected. Please contact Customer Contact Center at 081-2222-5674",
            RelativeNotifiedDateAndTime = GetRelativeNotifiedDateAndTime(DateTime.Now.AddDays(-1)),
            NotificationEvent = "danger",
            LoginUserId = 2,
            Id = 2
        },
        new NotificationDto()
        {
            Title = "Application Submitted Successfully.",
            Text = "Your application has been submitted for the approval.",
            RelativeNotifiedDateAndTime = GetRelativeNotifiedDateAndTime(DateTime.Now.AddDays(-3)),
            NotificationEvent = "info",
            LoginUserId = 2,
            Id = 3
        },
    };
}
On the server side, we can add this ‘RegisterForWebNotifications’ method to the NotificationHub class.
public class NotificationHub : Hub<IClientNotifications>
{
    public async Task RegisterForWebNotifications(int userId)
    {
        await Groups.AddToGroupAsync(Context.ConnectionId, userId.ToString());
    }
}
When you are logged out from the web application, we can simply use the following code snippet to deregister from the SignalR service.
this.$socket.invoke('DeregisterFromWebNotifications', this.userId)
On the server side, we can add this ‘DeregisterFromWebNotifications’ method inside NotificationHub class.
public class NotificationHub : Hub<IClientNotifications>
{
    public async Task DeregisterFromWebNotifications(int userId)
    {
        await Groups.RemoveFromGroupAsync(Context.ConnectionId, userId.ToString());
    }
}
Server to Client communication
Server-to-client notification is important when notifying clients based on various events happening in the system. We have already discussed a way we can send events to clients outside of the hub. Here, we can use that feature to notify events of clients.
Example: You can simply use the following code snippet to notify the client of data updated event. Here, the string value of the user’s id is used as the key of SignalR notification groups.
await _hubContext.Clients.Groups(user.Id.toString()). ClientReceiveNotification(notification);
In frontend, this event can be captured via sockets provided by the SignalR client package.
@Component(
  {
    sockets: {
      ClientReceiveNotification (data) {
        this.clientReceiveNotification (data);
      }
    }
  }
)
export default class CustomNavBarComponent extends Vue {
	showNotificationBadge: boolean = false;
  clientReceiveNotification (data){
    this.showNotificationBadge = true;
    this.$bvToast.toast(data.text, {
      title: data.title,
      autoHideDelay: 5000,
      variant:  data.notificationEvent,
      appendToast: false
    })
  }
}
Here we can use BoostrapVue toast message to show the notification received through SignalR.
When you receive a notification, the notification bell icon indicates it as below.
 You can click on the notification icon to check received notifications.
Conclusion
The main intention of this article is to show how we can implement a simple notification system using basic functionalities provided by SignalR. Additionally, this article shows how we can implement a notification panel in a Vue application and how to enable bi-directional communication between a Vue application and a .NET application.