Three Js to get 3D content on a webpage
By Dilshani Karunarathna
Three.js is a cross-browser JavaScript library and application programming interface (API) used to create and display animated 3D computer graphics in a web browser using WebGL.
WebGL is a low-level system that only draws points, lines, and triangles. WebGL with three.js handles scenes, lights, shadows, materials, textures, 3d math, etc.
In this blog post, you will learn how to create animated 3D computer graphics in a web browser using Three Js.
Before we dig into the application there are several prerequisites.
- JavaScript
- HTML and create DOM elements in JavaScript
- ES6 modules
Most browsers that support Three.js, update the content automatically. If you want to run this code on older browsers, you can use a transcompiler like Babel.
Lets’ see what are the advantages and disadvantages of this library.
Pros
- Easy to learn
- Plenty of examples
- Large community, lots of third-party plugins and support almost all the Web browsers
- Great performance
- Physical Based Rendering
- Support for most of the popular model formats
- Does not require any client or plugin to add 3D
- Provides access to the power of the graphics of a computer
- Provides abstraction for WebGL projects
- Very flexible
- Has great documentation.
Cons
- Dependent on OpenGL 2.0 drivers.
- Many developers are not aware
- Irrespective of the latest improvements in JavaScript, the developers find it slow and many people are unfamiliar with writing the code of 3D applications.
By considering these pros and cons developers use three.js for
- Web pages by associating it with a local or remote copy.
- Model visualization and scene creation.
- Game and simulation authoring tools.
- Can use plugins to add the standard features such as keyboard and management of mouse.
- To create and display animation 3D graphics on the web.
- To develop web applications that run on web browsers.
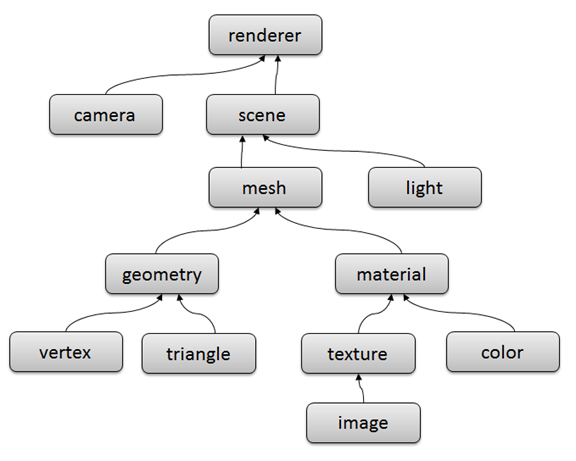
This is the architecture of a three.js app. These objects define a hierarchical structure and represent where objects appear and how they are inclined.

The Renderer is the main object of three.js. We can pass a Scene, a Camera to a Renderer and it renders (draws) the portion of the 3D scene that is inside the frustum of the camera as a 2D image to a canvas.
- Texture objects generally represent images either loaded from image files, generated from a canvas, or rendered from another scene.
- Material objects represent the surface features by using the color and the texture
- Geometry objects build on top of vertex and triangle objects.
- Mesh objects represent drawing a specific geometry with a specific Material. So both material objects and Geometry objects can be used for multi-mesh objects.
- Light objects represent different kinds of lights.
- Scenes add and remove objects at run-time including the lights
- The Renderer is the main object of three.js. We can pass a Scene, a Camera to a Renderer and it renders (draws) the portion of the 3D scene that is inside the frustum of the camera as a 2D image to a canvas.
Installation
You can install three.js with npm and modern build tools or with static hosting or a CDN. Whatever the method, it should be consistent and import all files from the same version in the library because it can cause duplicate code to enter or even crash the application in unexpected ways.
- Install from npm
npm install --save three
Usage: Option 1: Import the entire three.js core library.
import * as THREE from 'three';
const scene = new THREE.Scene();
Option 2: Import the parts you need.
import { Scene } from 'three';
const scene = new Scene();
The core of three.js focused on the most important components of a 3D engine. To access other popular parts of the library like controls, loads, and post-processing effects, you must be imported from https://github.com/mrdoob/three.js/tree/dev/examples/jsm. These components can be remixed and customized while using and always kept in sync with the core library.
Usage: import { OrbitControls } from ‘three/examples/jsm/controls/OrbitControls.js’; const controls = new OrbitControls();
- Install from CDN or static hosting
<script type="module">
  import * as THREE from 'https://cdn.skypack.dev/three@<version>';
  const scene = new THREE.Scene();
</script>
Similarly to access other components import the required components from https://github.com/mrdoob/three.js/tree/dev/examples/jsm.
<script type="module">
  import { OrbitControls } from 'https://cdn.skypack.dev/three@<version>/examples/jsm/controls/OrbitControls.js';
  const controls = new OrbitControls();
</script>
Creating a scene
Let’s set up a scene, with a spinning cube. For that, we need somewhere to display it. Create a display like this.
<!DOCTYPE html>
<html>
	<head>
		<meta charset="utf-8">
		<title>My first three.js app</title>
		<style>
			body { margin: 0; }
		</style>
	</head>
	<body>
		<script src="js/three.js"></script>
		<script>
			// Our Javascript will go here.
		</script>
	</body>
</html>
Save this HTML file along with a copy of three.js in the js/ directory, and open it in your browser. First, set up the scene, camera, and renderer. There are different types of cameras like ArrayCamera, Camera, CubeCamera, OrthographicCamera, PerspectiveCamera, and StereoCamera. For now, let’s use a PerspectiveCamera because it most closely mimics the real world and the human eyes.
Constructor
PerspectiveCamera( fov : Number, aspect : Number, near : Number, far : Number )
- fov — Camera frustum vertical field of view. The value is in degrees.
- spect — Camera frustum aspect ratio. (window.innerWidth/ window.innerHeight)
- near — Camera frustum near the plane.
- far — Camera frustum far plane.
Similar to cameras, there are different types of renderers. They are WebGLMultipleRenderTargets, WebGLMultisampleRenderTarget, WebGLRenderer, WebGL1Renderer, WebGLRenderTarget, WebGLCubeRenderTarget. However, since the WebGLRenderer provides the flexibility and power to create scenes with no limitations, let’s use WebGLRenderer.
Constructor
WebGLRenderer( parameters : Object-optional )
- canvas - where renderer draws its output
- context - attach the renderer to an existing RenderingContext.
- precision - Can be “highp”, “mediump” or “lowp”.
- alpha - whether the canvas contains an alpha (transparency) buffer or not.
- premultipliedAlpha - whether the renderer will assume that colors have premultiplied alpha.
- antialias - whether to perform antialiasing.
- stencil - whether the drawing buffer has a stencil buffer of at least 8 bits.
- preserveDrawingBuffer - whether to preserve the buffers until manually cleared or overwritten.
- powerPreference - Provides a hint to the user agent indicating what configuration of GPU is suitable for this WebGL context. Can be “high-performance”, “low-power” or “default”.
- failIfMajorPerformanceCaveat - whether the renderer creation will fail upon low performance is detected.
- depth - whether the drawing buffer has a depth buffer of at least 16 bits.
- logarithmicDepthBuffer - whether to use a logarithmic depth buffer.
Then we need to set the size at which we want it to render our app. Finally, add the renderer element to the HTML document.
var scene = new THREE.Scene(); // to create a scene
var camera = new THREE.PerspectiveCamera( 50, window.innerWidth / window.innerHeight, 0.1, 2000 );

var renderer = new THREE.WebGLRenderer();
renderer.setClearColor("#eeeeee");
renderer.setSize( window.innerWidth, window.innerHeight );
document.body.appendChild( renderer.domElement );
To make the scene responsive, listen to the resize event and adjust the size and the camera aspect ratio.
window.addEventListener('resize', () => {
            renderer.setSize(window.innerWidth, window.innerHeight);
            camera.aspect = window.innerWidth/ window.innerHeight;
            camera.updateProjectionMatrix();
        })
Three js provides different ways to create 3D elements. You can create them from scratch by defining vertices or by importing 3D objects or, importing primitive shapes.
So, let’s create a 3D cube.
To create a cube, we can use BoxGeometry, which contains all the points (vertices) and fill (faces) of the cube. We can use the material to color it.Three.js comes with a few items but let’s use MeshLambertMaterial.
Constructor
MeshLambertMaterial( parameters : Object )
- appearance. Any property of the material (including any property inherited from Material) Then we need a mesh to take geometry and apply a material to it so that we can insert it into our scene and move it freely.
When we call scene.add(), by default it is added to the coordinates (0,0,0). This causes both the camera and the objects to be inside each other. To avoid this we place the camera out a bit.
const geometry = new THREE.BoxGeometry();
const material = new THREE.MeshBasicMaterial( { color: 0x00ff00 });
const mesh = new THREE.Mesh( geometry, material );
mesh.position.set(1,0,0);
scene.add( mesh);
camera.position.z = 5;
There are different types of lights namely, AmbientLightProbe, DirectionalLight, HemisphereLight, HemisphereLightProbe, LightProbe, PointLight, RectAreaLight, SpotLight. Let’s use AmbientLight. This globally illuminates all objects in the scene equally and cannot be used to cast shadows as it does not have a direction.
var light = new THREE.AmbientLight(0xFFFFFF);
light.position.set(10,10, 10);
scene.add(light);
To visualize the changes we need to render or animate the loop.
const animate = function () {
	requestAnimationFrame( animate );
	renderer.render( scene, camera );
}
animate();
This will create a loop that causes the renderer to draw the scene every time the screen is refreshed.
To make this object animated add the following right above the renderer.render call in your animate function.
mesh.rotation.x += 0.01;
mesh.rotation.y += 0.01;
This executes every frame and gives the object a rotation animation. Anything you want to move or change while the app is running has to go through the animate loop.
Now you have your first three.js application.
Visit https://threejs.org/ there are a lot of awesome examples which can be used to create different scenes for games, modern GUI , etc.

