OAuth Implementation for ASP.NET Web API using Microsoft Owin.
By Tharindu JayasingheOAuth is an open standard for token based authentication and authorization on internet. In simple terms OAuth provides a way for applications to gain credentials to other application without directly using user names and passwords in every requests. This is to reduces the chances of user name and passwords getting compromised in the wire and improve the security.
This post explains how to implement the OAuth token based authentication mechanism to your Web API methods.
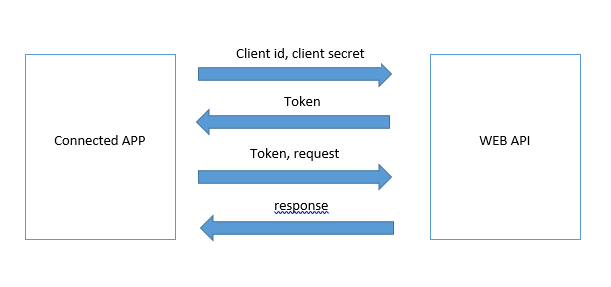
Let’s take an example where several third party connected apps try to connect to a web api with the given client id and client secret. Imagine the scenario where all the connected apps will have background processes to get and post data through the web api and there are no users involved. So in this case it uses client id and client secret to generate a token. The following diagram explains the process.
Now as you have an understanding of what the business requirement is Let’s look into the code how we can implement the token based authentication to the web api solution.
First Create the Web API project through Visual Studio. (File -> New -> Project)

Then we need to install the required packages to the project.
Microsoft.Owin.Security.OAuth
Then we can create our partial startup class as follows.
namespace Demo.WebApi
{

  public partial class Startup
  {

    public static OAuthAuthorizationServerOptions OAuthOptions { get; private set; }

    static Startup()
    {
      OAuthOptions = new OAuthAuthorizationServerOptions
                          {
                            TokenEndpointPath = new PathString("/oauth/token"),
                            Provider = new OAuthAppProvider(),
                            AccessTokenExpireTimeSpan = TimeSpan.FromDays(General.AccessTokenExpiryDays),
                            AllowInsecureHttp = General.UseHttp
                          };

    }

    public void ConfigureAuth(IAppBuilder app)
    {
      app.UseOAuthBearerTokens(OAuthOptions);
    }
  }
}
In the above code Token end point refers to the relative path of your web api which needs to be called to generate the token. In this case it is “oauth/token”
Provider is the custom class that we write with the authentication and token generation logic.
Access Token Expire Time Span refers to the duration we want to keep the token alive. We can define this in the web config file and refer it from there. In the above code General class property reads the web config value.
Allow Insecure Http refers whether we want to restrict the web api to be accessed through secured layer or not.
Then from the main start up class we can call the above ConfigureAuth method as follows.
namespace Demo.WebApi
{
  public partial class Startup
  {
    public void Configuration(IAppBuilder app)
    {
      ConfigureAuth(app);
    }
  }
}
The general class would look like this.
public class General
{
  public static bool UseHttp
  {
    get
    {
      if (ConfigurationManager.AppSettings["UseHttp"] != null)
      {
      return Convert.ToBoolean(ConfigurationManager.AppSettings["UseHttp"]);
      }
      else return false;
    }
  }
}
Next, we will see how to implement the OAuthProvider Class. Basically in that class we can override the methods so that we can define the way we want to generate the token.
The following class implementation represents how to implement the token generation using client id and client secret. (Apart from this we can override the GrantResourceOwnerCredentials() in case we want to use username,password combination for generating the password).
First we need to override the ValidateClientAuthentication method. From this we extract the client id and client secret in the request.
namespace IPG.WebApi.Provider
{
  public partial class OAuthAppProvider : OAuthAuthorizationServerProvider
  {
    public override Task ValidateClientAuthentication(OAuthValidateClientAuthenticationContext context)
    {
      string clientId;
      context.TryGetFormCredentials(out clientId, out clientSecret);
      if (!string.IsNullOrEmpty(clientId))
      {
      context.Validated(clientId);
      }
      else
      {
      context.Validated();
      }
      return base.ValidateClientAuthentication(context);
    }
  }
}
Next we will override GrantClientCredentials method inside the same class. Here we validate the client id and client secret with the DB and create the token. For the token we can add claims as we want. In this case we add the client id only. This claims will be accessible via the context object in the subsequent requests.
public override Task
GrantClientCredentials(OAuthGrantClientCredentialsContext context)
{
  return Task.Factory.StartNew(() =>
  {
    try
    {
      bool isValid = false;
      isValid = true; //This should be the Service/DB call to validate the client id, client secret.
      //ValidateApp(context.ClientId, clientSecret);

      if (isValid)
      {
        var oAuthIdentity = new ClaimsIdentity(context.Options.AuthenticationType);
        oAuthIdentity.AddClaim(new Claim("ClientID", context.ClientId));
        var ticket = new AuthenticationTicket(oAuthIdentity, new AuthenticationProperties());
        context.Validated(ticket);
      }
      else
      {
        context.SetError("Error", tuple.Item2);
        logger.Error(string.Format("GrantResourceOwnerCredentials(){0}Credentials not valid for ClientID : {1}.", Environment.NewLine, context.ClientId));
      }
    }
    catch (Exception)
    {
      context.SetError("Error", "internal server error");
      logger.Error(string.Format("GrantResourceOwnerCredentials(){0}Returned tuple is null for ClientID : {1}.", Environment.NewLine, context.ClientId));
    }
  });
}
Then, we will look at how to authorize the controller actions using this token. It is simple, all you need to do it decorate the action with the [Authorize] tag. This will check token validity before its executes the action method. Following is an example. Create a controller called “PropertyController” and inside that you can define an action as below.
public class PropertyController : ApiController
{
[Authorize]
[HttpGet]
public IHttpActionResult GetProperty(int propertyID)
{
  int clientID = OwinContextExtensions.GetClientID();
  try
  {
    //var result = Service or DB Call(clientID, propertyID)
    return Json(new
    {
      PropertyName = string.Format("Property - {0}", propertyID),
      Success = true
    });
  }
  catch (Exception ex)
  {
    return Content(HttpStatusCode.InternalServerError, ex.Message);
  }
}
}
Here you can extract the claims that you have added to the token. In our example it was only the client id. You can write a separate class for these types of extractions. Following shows that extension class.
public static class OwinContextExtensions
{
  public static int GetClientID()
  {
    int result = 0;
    var claim = CurrentContext.Authentication.User.Claims.FirstOrDefault(c => c.Type == "ClientID");

    if (claim != null)
    {
      result = Convert.ToInt32(claim.Value);
    }
    return result;
  }

  public static IOwinContext CurrentContext
  {
    get
    {
      return HttpContext.Current.GetOwinContext();
    }
  }
}
That’s pretty much it. Now we can test the web api using postman as shown below.
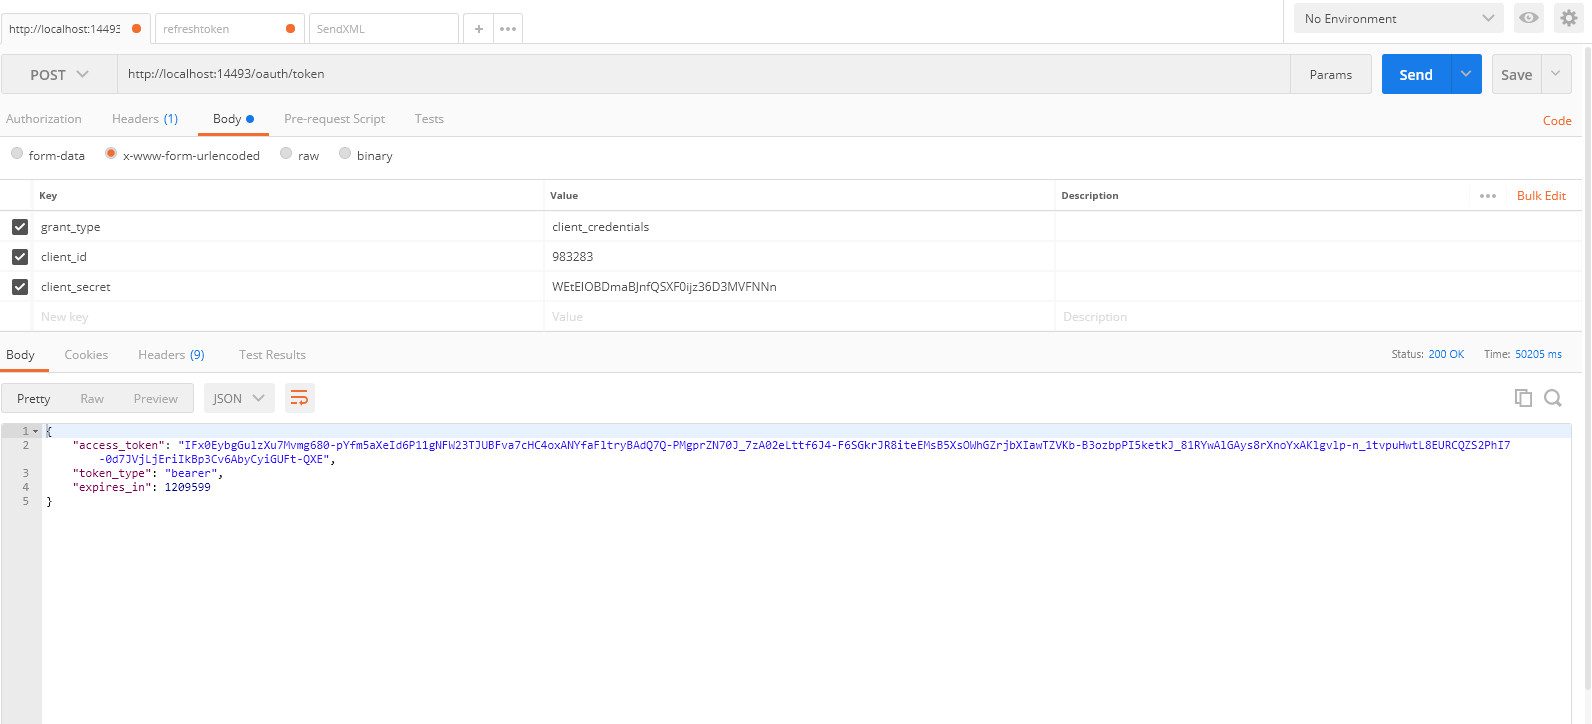
We need to enter the correct url. It should be the “websiteurl/oauth/token”. The relative path should matched with the token end point that we have configured in the oauth options. Once the client id and secret is validated access token is generated as above.
We can use this token in order to call other api methods which we have decorated with [authorize] attribute. In our example we are going to call the GetProperty action in our Property controller using that token. The way to call your action using postman is shown below.
You need to use Authorization tag and as the value (Bearer “token”). This is the token generated in the previous step.

There you go. You have the response. Simple as that. You can write your own controllers and actions and build a complete web api from here onwards.
In my next post I will share how we can integrate swagger and directly call our web api using that without using postman.