Basics of Photography
By Biman Pathirage‘The art, application and practice of creating durable images by recording light or other electromagnetic radiation, either electronically by means of an image sensor, or chemically by means of a light-sensitive material such as photographic film.’ – Wikipedia.
Not simple enough? Finish the article and you will see how simple it actually is!
What you need to start photography.
A camera. That is all. You will only need a camera to start photography. However, it’s good if you can use a camera that allows the photographer to adjust the shutter speed, aperture, and ISO. These three settings are the main pillars of a good photograph. Although most of us use our smart phone cameras to take instant photos, some of them might not have options to adjust these three settings. So its recommended that you have at least the most basic DSLR or Bridge cameras to get into photography more seriously.
Exposure
The most important factor in a photograph is the exposure. Over exposed photos will look too bright to the naked eye while under exposed photos will look too dark.

In the above photo, it’s clear that the 1st and 3rd sections are not correctly exposed, hence not visually pleasing to the eye as much as the 2nd section. So it’s pretty important that you take great care in adjusting your exposure when capturing a photo. To adjust the exposure, its important to have an initial idea on aperture, shutter speed and ISO of a camera.
Following image depicts how these three factors control the exposure of an image.

Aperture
Aperture is the hole inside the lens through which the light passes, similar to the pupil of a human eye. Wider the aperture, more light it will allow to pass through. The aperture scales for most of the cameras are as follows: f/1.4, f/2, f/2.8, f/4, f/5.6, f/8, f/11, f/16, and f/22, f/22 being the smallest aperture allowing a very small amount of light in to the lens.
Aperture also helps to alter the amount of blurring of the unfocused parts of the photograph, which is also known as the depth of field. The more the aperture, the more it will blur the background.

The following photo was taken using a very high aperture. Therefore the front part of the small body of this ant is focused and the latter part is blurred. This is a great example for a photo with a small depth of field.

Shutter speed
After the light passes through the lens aperture, it reaches the shutter of the camera. The shutter is mostly situated in the body of a camera (while the aperture resides in the lens of a camera). The blurriness of a photo depends mostly on the shutter speed. Shutter speed is the speed at which the shutter opens and closes at a time, allowing a certain amount of light in to the camera. Generally, the highest shutter speed at which a normal photographer can take a photo without blurring is around 1/80 seconds (only using his hands). If you are a pro photographer, you should be able to take clear, un-blurred photos at even 1/20 seconds. For speeds higher than that, you will need a tripod to support the camera.

Different shutter speeds will complement different scenarios. If you want to capture a fast moving object to a still photo, you will have to use a very small shutter speed (about 1/900 seconds). If you use a higher shutter speed for such instances, you will be able to capture more artistic photos with motion blurring. Following are some examples of images taken with higher shutter speeds.

For the photo above, I have used a shutter speed of 1/80 seconds. Since the car is moving at a considerable speed, it moves from one position to another during 1/80 seconds, therefore the image gets a nice motion blur.

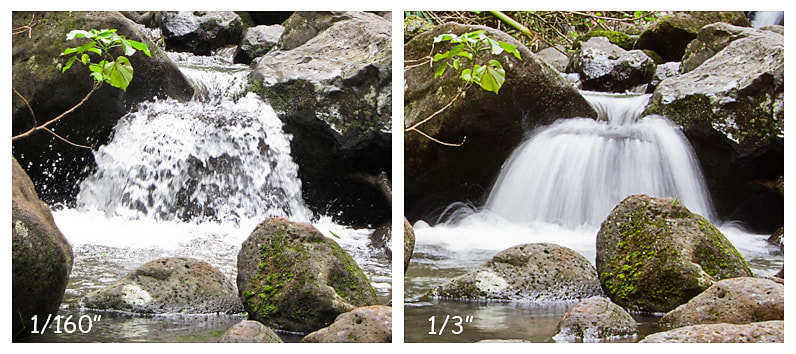
Similarly, the water flows at a considerable speed in this river. I have used a shutter speed of 1/4 seconds to get the silky effect of water flowing. If I had used a lower shutter speed of about 1/300 seconds, photo would look more artificial since it will not get the silky effect. Following image will provide more insights in to shutter speed controlling.
ISO
Once the light passes through the lens aperture and the camera shutter, it will reach the sensor, which is the final step of creating a photograph. ISO comes in to play at this step. With a higher ISO value, you will get a more exposed photo. That means for instances with low background light, you will have to use a higher ISO value (ISO 800 – ISO 12800) and for instances with bright background light (daytime photos), you will have to use a lower ISO value (ISO 100 – ISO 400).
With higher ISO values, photographs tend to be noisier (grainy images), so it’s important to choose a correct ISO value according to the light that is available and adjust the shutter speed and aperture to match the ISO settings.

An image taken using a high ISO value at night without using the artificial flashers.

To create great photographs, you should always have a good combination of these three basic factors to get the ideal exposure for the photo.
Composition of an image
Composition of an image simply means the way you arrange the subjects in a photograph. When it comes to composition, there is no right or wrong. There are no hard-and-fast rules. For every rule, there are countless images that break the rule and still look awesome. But for a majority of photos, there are few rules that work well when applied.
Rule of thirds
Imagine that your image is divided into 9 equal segments by 2 vertical and 2 horizontal lines. It has been found out through research that as soon as a person looks at the image, the human eye initially captures the 4 points at which these lines intersect. Therefore, the rule of thirds suggests that you should position the most important elements in your photo at the points where the lines intersect or along these lines.

In the above photograph, I have positioned the sun at an intersection and the mountain range along the lower horizontal line to make it more visually pleasing to the eye.
Using eye lines
Capturing animals from their eye level always provides you better photos that when you take the photo from above or below. Taking the photo from above has two bad effects. It renders the subject ‘normal’ in the eyes of the viewer – because this is the angle they see it normally. This upright position also tends to make the animal seem small and subservient. When taking the photo at their eye level, the line of sight view the animal has, and the impact of the stare, can all be used to good advantage. Following are some examples of photos of animals taken at their eye level.


Symmetry
Try to use symmetric compositions whenever there is no main subject in your photo. The perfect example of balance is symmetry where one half (top/bottom, left/right, diagonal split) of an image is identical—or nearly identical—to the other. There are many examples of symmetry, in both nature and the manmade world. Sometimes the slightest misalignment can be very distracting in an image. For example, if you are creating a symmetrical photograph of a building, be sure to stand precisely at a center point and keep the camera perpendicular to the face of the building. If you are half a step off to one side, or have the camera just off the 90-degree angle, lines will deflect in the image.

A frame within a frame
In the photo below, I have used the window of a train to frame the sunset over the horizon. The use of scenery viewed through arches was a common feature of Renaissance painting as way of portraying depth. Frames don’t always have to be man-made objects such as arches or windows. Using a ‘frame within a frame’ presents a great opportunity to use your surroundings to be creative in your compositions.

Leading lines
Leading lines help lead the viewer through the image and focus attention on important elements. Anything from paths, walls or patterns can be used as leading lines. Take a look at the example below. In this image I wanted the viewer to focus on the far horizon at the end of the road. For that I have used the two edges of the road to lead the viewer towards the main subject. Notice that this is a symmetrically balanced photo as well.

Simplicity and minimalism through leaving negative space
Leaving a lot of empty or ‘negative’ space around your subject can be very attractive. It creates a sense of simplicity and minimalism. It also helps the viewer focus on the main subject without distractions. In the photo below, I have made use of a very simple and uncluttered background to focus attention on the couple. Notice that I have also focused the couple according to the rule of thirds to get more attention.

Golden triangles and golden ratio
The golden triangles composition works in a very similar way to the rule of thirds. Instead of a grid of rectangles however, we divide the frame with a diagonal line going from one corner to another. We then add two more lines from the other corners to the diagonal line. The two smaller lines meet the big line at a right angle as is illustrated below. This divides the frame into a series of triangles. As with the rule of thirds, we use the lines (of the triangles in this case) to help us position the various elements in the scene. This photo taken from the internet depicts a very good example of the golden triangles.

The golden ratio is like a slightly more complex version of the rule of thirds. Instead of a regular grid, the frame is divided into a series of squares as in the examples below. This is known as a ‘Phi Grid’. You can then use the squares to draw a spiral that looks like a snail’s shell. This is called a ‘Fibonacci Spiral’. The squares help to position elements in the scene and the spiral gives us an idea of how the scene should flow. It’s a little like an invisible leading line. It is believed that the golden spiral method of composition has been in existence for over 2,400 years having been devised in Ancient Greece. It is widely used in many types of art as well as architecture as a way of creating aesthetically pleasing compositions.

It would be impossible for you to remember all these rules or guidelines when taking a photograph. But whenever you do take a photo, try to remember at least one or two of these rules and after some practice, everything will become ingrained. After that you will be using them naturally even without realizing it.