A Simple Guide to Object Detection in Computer Vision.
By Anupaddra Thathsarani.Unveiling YOLO Algorithm: A Simple Guide to Object Detection in Computer Vision
What is YOLO Algorithm? Fundamentally, YOLO is transforming computers’ perception of the world, much like a superhero would. Imagine being able to identify objects in a picture. Conventional approaches are akin to piecemeal puzzle assembly, analyzing the image gradually. Conversely, YOLO says, “I got it!” after taking a quick look at the entire image. YOLO’s core feature is its ability to process the entire image at once, which makes it incredibly quick and effective. The YOLO journey doesn’t stop there. It has developed into several iterations over time, from YOLOv1 to YOLOv8. Every iteration function as a modern-day superhero, possessing enhanced abilities to identify objects quickly and precisely.

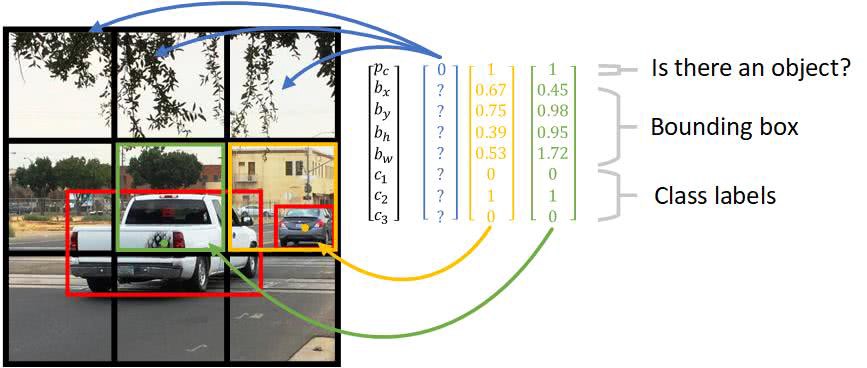
How YOLO Works Now let’s explore the workings of YOLO’s magic. Imagine that YOLO overlays an image, which is a grid. Every square in the grid takes on the role of a detective, searching its borders for objects. YOLO recognizes an object’s type and anticipates its location within each square. Discovering every object in the picture is akin to a group of investigators cooperating. The confidence component now enters the picture. In addition to identifying objects, YOLO also provides a confidence score that expresses how certain it is of locating them. YOLO uses an ingenious method known as non-maximum suppression to prevent redundancy and make sure that the same detection isn’t made too frequently.
YOLO Training Process YOLO takes a lot of photos, each labeled with the location of the objects, for it to become an intelligent detective. This method is like presenting a collection of photos to YOLO and pointing out specific objects, like a car or a cat. The key components of YOLO’s training are pattern recognition and repetition. Through exposure to many labeled images, YOLO is trained to associate patterns with objects.
YOLO Implementation
-
Choosing the Framework To begin, it is required to decide on a framework for YOLO implementation. TensorFlow, PyTorch, and the Darknet are popular options. Each has a unique set of benefits and backing from the community.
-
Download Necessary Files To download the necessary pre-trained weights, network architecture definition, and YOLO configuration files, we can visit the official website or repository of the framework of our choice.
-
Configuration Then we have to adapt the YOLO configuration files to our unique requirements. These files usually contain learning rates, network architecture parameters, and other settings. For the best results, these configurations must be fine-tuned.
-
Weights and Pre-trained Models The YOLO model’s pre-trained weights can greatly improve the model’s object detection capability and are learned from large datasets. After downloading we have to verify that the pre-trained weights and the model architecture are compatible.
-
Integration with Your Code Then it is required to import the required libraries or modules that the selected framework provides to incorporate YOLO into the codebase. In this step, the input and output layers are defined, weights are loaded, and the network is configured.
-
Data Preprocessing In this step, we draw bounding boxes around the interesting objects in photos to annotate them. Make sure the annotations, which include the object class and bounding box coordinates, follow the YOLO format.
-
Training After data preprocessing, we make use of the prepared dataset to train the YOLO model. To increase detection accuracy, this entails feeding the network with the annotated images, it is required to modify the model’s parameters during training and updating the weights. The complexity of the dataset and the hardware specifications can affect training times.
-
Fine-tuning (Optional) To improve performance for domain-specific tasks, fine-tune the model on a particular dataset if necessary. When YOLO needs to adjust to distinct qualities that aren’t sufficiently reflected in the pre-trained weights, this step is especially helpful.
-
Testing and Evaluation: To gauge the performance of the YOLO model, we can test it on a different test dataset and determine metrics like accuracy, recall, and precision to see how well the model applies to fresh, untested data.
-
Real-Time Object Detection Finally, we can use the trained and successfully evaluated YOLO model for real-time object detection. This entails processing images or live video streams with the model, identifying and categorizing objects along the way.
YOLO Challenges and Improvements
YOLO algorithm also has obstacles to overcome. It faces challenging assignments, but researchers act as mentors, helping YOLO get over challenges and improve.
• YOLO has trouble identifying objects of different sizes, particularly when they are present in the same image.
• For YOLO, recognizing fine-grained details, that is, minute details within objects can be difficult.
• When there are a lot of objects closely grouped together in a scene, YOLO may have trouble, which could result in incorrect classifications or missed detections.
• YOLO faces an ongoing challenge in weighing the trade-off between speed and accuracy, particularly in real-time applications.